HUMMIX On-Premises is installed in a Kubernetes cluster. It uses PostgreSQL, MongoDB, Redis database management systems, RabbitMQ service bus, and an S3 compatible object storage (MinIO). For more details, refer to the Architecture article.
Before starting the installation, read the system requirements of HUMMIX On-Premises.
The installation consists of five steps:
- Prepare infrastructure (optional).
- Download the Helm chart and the configuration file.
- Fill out the configuration file.
- Install HUMMIX using helm in a Kubernetes cluster.
- Install add-ons for HUMMIX (optional).
While installing the HUMMIX application, you can monitor the status of the pods and view their logs.
Step 1: Prepare infrastructure (optional)
By infrastructure we mean the necessary components for the operation of the HUMMIX On-Premises application.
Attention
The client deploys the dependent components independently. All work related to organizing a high-availability local architecture and setting up the high availability of dependent components is also done by the client.
Components necessary for HUMMIX On-Premises operation:
- Kubernetes cluster.
- PostgreSQL.
- MongoDB.
- RabbitMQ.
- Valkey or Redis.
- S3.
In this article, databases and the S3 storage are installed in the Kubernetes cluster as per the Prepare embedded databases article and use standard connection strings and passwords. This configuration is provided as an example for a trial installation only and is not a recommendation for production use. For a production environment, we recommend hosting PostgreSQL, MongoDB, and S3 on separate external resources.
Requirements for component configuration
KubernetesThe system is installed using Helm in a Kubernetes cluster, which contains the following components: ingress-nginx controller, coredns, rbac, storageclass. For supported versions of Kubernetes and Helm, see the System requirements for HUMMIX On-Premises article. Also, proxying from pods to the external network should be allowed. Read more about how to deploy a Kubernetes cluster in the Kubernetes section. Data storageYou can use your existing databases and S3 storage as components for HUMMIX On-Premises. There is also an option to combine your components with those deployed using the In a production environment, we recommend installing and configuring external PostgreSQL, MongoDB, and S3. In the next installation steps, you will need to specify the connection strings to the databases and the S3 storage. If there's a need to deploy all or just the missing components, refer to the articles in the Databases section.
High availabilityTo ensure continuous operation of HUMMIX on Bare-metal servers, it is necessary to build a high-availability Kubernetes cluster and ensure the operation of the used databases and S3 storage. For more details on building a high-availability environment for HUMMIX, refer to Prepare HUMMIX On-Premises infrastructure.
Offline installation (Air-gap)You can install HUMMIX in a closed-loop environment without direct access to the external container image storage. For this, on a computer with internet access, you need to download the HUMMIX application images and import them into a local image repository. Read more in Download HUMMIX images. |
You can skip this section if the component configuration requirements are met and there’s no need to deploy components necessary for the operation of HUMMIX On-Premises.
Step 2: Download the Helm chart and configuration file
Obtain the values-hummix.yaml configuration file for installation via the internet:
- For the latest version of the system by executing the following command:
helm repo add hummix https://charts.hummix.co
helm repo update
helm show values hummix/hummix > values-hummix.yaml
- For the certain version of the system by executing the
helm show values hummix/hummixcommand with the--versionflag:
helm repo add hummix https://charts.hummix.co
helm repo update
helm show values hummix/hummix --version <hummix-chart-version> > values-hummix.yaml
Where <hummix-chart-version> is the system version required.
Obtaining the configuration file for installation in an isolated environment without internet access
helm repo add hummix https://charts.hummix.co
tar -xf hummix-X.Y.Z.tgz |
Step 3: Fill out the configuration file
For a quick start of the app, fill out the main parameters:
global.host: domain (FQDN) or IP address by which the system will be accessible. The IP address is only valid in limited scenarios, such as when not using Ingress/Nginx with host-based routing and TLS with SNI.- global.edition: specify the edition of the HUMMIX application to be installed.
bootstrapCompany.email: administrator’s email.bootstrapCompany.password: administrator’s password.db.psqlUrl: connection string to the PostgreSQL DB.db.mongoUrl: connection string to the MongoDB for the app.db.vahterMongoUrl: connection string to the MongoDB for the authorization server.db.redisUrl: connection string to Valkey or Redis.db.amqpUrl: connection string to RabbitMQ.db.s3.method: request method to S3.db.s3.accesskeyid: S3 username.db.s3.secretaccesskey: password for the S3 user. Use the acceptable characters.db.s3.bucket: S3 bucket.db.s3.backend.address: S3 address.db.s3.backend.region: S3 region.db.s3.ssl.enabled: enabling S3 SSL.
Note
Note
The following characters are acceptable for passwords:
- Uppercase Latin letters: A to Z.
- Lowercase Latin letters: a to z.
- Numbers: 0 to 9.
- Characters: -_.
Reserved (unacceptable) characters:
! * ' ( ) ; : @ & = + $ , / ? % # [ ] { }
Fill in the variables in the values-hummix.yaml file by performing the following actions:
- Set the FQDN domain or IP address through which the system will be accessible in the
global.hostparameter.
In the article Prepare embedded databases, on step 1, you should have prepared an S3 MinIO storage, which is accessible via the FQDN domain hummix_server.your_domain. When using the built-in S3 storage accessible by the FQDN, HUMMIX should be accessible under the same domain name. To do this, in global.host specify hummix_server.your_domain and enable the ingress binding to the domain hummix_server.your_domain. To do this, set the value true for the ingress.hostEnabled parameter.
global:
# domain (FQDN) or IP address where the system will be available
host: 'hummix_server.your_domain'
ingress:
hostEnabled: true
- In the global.edition parameter, specify the HUMMIX edition: enterprise or standard.
- Complete the company creation parameters in the
bootstrapCompanysection. The company will be created during the HUMMIX installation. - Set the administrator’s email address in the
bootstrapCompany.emailparameter. This address will serve as the login for the main administrator.
Attention
The main administrator’s login cannot be changed after the system installation.
- Indicate, according to your security policy, the password for the main administrator’s login in the
bootstrapCompany.passwordparameter. Use the acceptable characters. - Set the company language in the
bootstrapCompany.localeparameter, for example, en-US:
bootstrapCompany:
# Admin email
email: "admin@mail.com"
# Admin password
password: "test"
# Installed system language, possible options: "ru-RU", "en-US", "sk-SK"
locale: "en-US"
- Set the installed system language in the language.default parameter, for example, en-US:
language:
# Installed system language, possible options: "ru-RU", "en-US", "sk-SK"
default: "en-US"
- Fill in the connection strings for the PostgreSQL, MongoDB, RabbitMQ, Valkey or Redis databases. To do this, you need to fill in the following parameters:
db.psqlUrl,db.mongoUrl,db.vahterMongoUrl,db.redisUrl,db.amqpUrl.
db:
# Connection string for Postgres DB, format:
postgresql://user:password@hostname:5432/databaseName
psqlUrl: 'postgres://postgres:pgpassword@postgres.hummix-dbs.svc.cluster.local:5432/hummix?sslmode=disable'
# Connection string for read-only Postgres DB, format:
postgresql://user:password@hostname:5432/databaseName
roPsqlUrl: ''
# Connection string for the MongoDB for the application, format:
mongodb://user:password@hostname:27017/databaseName
mongoUrl: 'mongodb://hummix:mongopassword@mongo.hummix-dbs.svc.cluster.local:27017/hummix?ssl=false&replicaSet=rs0&readPreference=secondaryPreferred'
# Connection string for MongoDB for the authorization server, format:
mongodb://user:password@hostname:27017/databaseName
vahterMongoUrl: 'mongodb://hummix:mongopassword@mongo.hummix-dbs.svc.cluster.local:27017/hummix?ssl=false&replicaSet=rs0&readPreference=secondaryPreferred'
# Connection string for Redis, format:
redis://user:password@redis.local:6379/databaseName
redisUrl: 'redis://redis.hummix-dbs.svc.cluster.local:6379/0'
# Connection string for Rabbit, format:
amqp://user:password@hostname:5672/vhost
amqpUrl: 'amqp://hummix:rmqpassword@rabbitmq.hummix-dbs.svc.cluster.local:5672/hummix'
- Fill in the parameters for connecting to the S3 file storage:
db.s3.method: S3 request method.db.s3.accesskeyid: S3 username.db.s3.secretaccesskey: password for the S3 user. Use the acceptable characters.db.s3.secretaccdb.s3.bucket: S3 bucket.db.s3.backend.address: S3 address.db.s3.backend.region: S3 region.db.s3.ssl.enabled: enable S3 SSL.
db:
s3:
method: PUT
accesskeyid: PZSF73JG72Ksd955JKU1HIA
secretaccesskey: aFDkj28Jbs2JKbnvJH678MNwiz88zKjsuNBHHs
bucket: s3hummix
backend:
address: hummix_server.your_domain
region: us-east-1
ssl:
enabled: "false"
# Address and path for private registry
|
The configuration file values-hummix.yaml contains a large number of parameters for the HUMMIX On-Premises application. For a more comprehensive guide on filling in variables in this file, see the Modify HUMMIX parameters article.
Step 4: Install HUMMIX using helm in the Kubernetes cluster
- If a namespace for installing HUMMIX hasn't yet been created, add it using the command:
kubectl create namespace hummix
Where hummix is the name of the namespace.
- This step is optional. To avoid specifying a namespace in commands in the current session, you can set the default namespace in the Kubernetes context. To do this, use the command:
kubectl config set-context --current --namespace=hummix
- In the
namespacefor HUMMIX installation, change the value for the Deckhouse security policy toprivilegedto avoid errors when deploying services. To do this, run the command:
kubectl label namespace hummix security.deckhouse.io/pod-policy=privileged --overwrite
- Install HUMMIX using the configuration file
values-hummix.yaml. If you need to install the application in a separate namespace, specify it in the installation command:
helm upgrade --install hummix hummix/hummix \
-f values-hummix.yaml \
--timeout=30m --wait [-n hummix]
To install the HUMMIX application in an isolated environment without internet access, run the following command:
helm upgrade --install hummix ./hummix \
-f values-hummix.yaml \
--timeout=30m --wait [-n hummix]
The installation time for the HUMMIX application takes 10-30 minutes. Wait for the update of the HUMMIX application parameters.
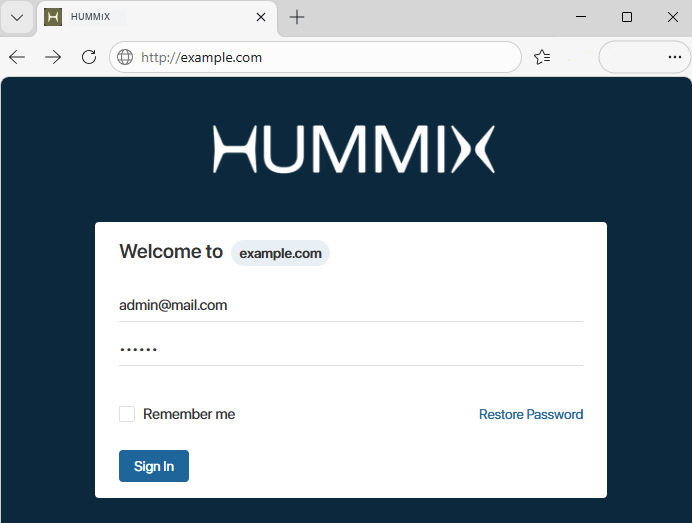
- Open a browser and navigate to the HUMMIX login page at
http://global.host. Theglobal.hostparameter was specified in thevalues-hummix.yamlconfiguration file in the step of downloading the helm chart and configuration file.
In the given example, the following login page address for the HUMMIX application is used: http://example.com.
- Use the administrator’s email address as the login and the password you used in the
values-hummix.yamlconfiguration file for the parametersbootstrapCompany.emailandbootstrapCompany.password.
In the given example, the following are used:
- Login: admin@mail.com.
- Password: test.
- Click the Login to the system button.
The HUMMIX application window will open.
- Activate the system. For more details, see Activate HUMMIX On-Premises.
The installation of the HUMMIX application has been successfully completed.
Attention
Save the values-hummix.yaml configuration file for future updates.
Step 5: Install add-ons for the HUMMIX application (optional)
Under add-ons for the HUMMIX application, components are understood that extend the functional and infrastructure capabilities of the HUMMIX application.
Add-ons list:
- Linkerd routing system (Service Mesh).
- Prometheus + Grafana monitoring system.
- Descheduler.
- NodeLocal DNSCache.
- Kyverno.
- KEDA.
- The Security Audit service for system versions lower than 2026.4.
Add-ons are installed as needed, considering the existing infrastructure. Articles in the Install add-on components for HUMMIX section will help decide whether you should to install an add-on component.
Monitor HUMMIX application status
During HUMMIX installation, you can use the following commands:
- To monitor pod status in real time:
kubectl get pods -n hummix -w
This allows you to monitor the statuses of all pods in the hummix namespace in real time. You can see when pods start, restart, or stop with an error.
- To view pod logs:
kubectl logs -f <pod_name> -n hummix
Where:
- <pod_name> is the name of the desired pod.
- -f is the command for monitoring new entries.