The distributed service architecture allows for more flexible scaling of the solution and running multiple instances of the application services. The exchange of information between services occurs through the gRPC protocol. The Linkerd add-on component performs balancing and encryption of gRPC traffic when scaling HUMMIX services. The HorizontalPodAutoscaler is used for auto-scaling the HUMMIX application services. You can also enable support for the additional auto-scaling tool KEDA, which is event-driven.
The process of enabling auto-scaling for the HUMMIX application consists of five stages:
- Prepare Service Mesh.
- Make changes to the configuration file.
- Apply auto-scaling parameters for HUMMIX.
- Enable load redistribution in the Kubernetes cluster (optional).
- Enable caching of DNS queries in the Kubernetes cluster (optional).
Step 1: Prepare Service Mesh
Linkerd is used as the Service Mesh for HUMMIX. This component is necessary to ensure the network connectivity of the HUMMIX application. Without the installed Service Mesh Linkerd, microservice traffic balancing is unavailable. Read more about setting up and installing Service Mesh Linkerd in Install Linkerd.
- In this article, the HUMMIX application is installed in
namespace: hummix. Add an annotation tonamespacewith the HUMMIX application for automatic injection of Linkerd-proxy containers into the HUMMIX services using the command:
kubectl annotate namespace hummix linkerd.io/inject=enabled
- Restart all services of the HUMMIX application using the command:
kubectl rollout restart deploy [-n namespace] && kubectl rollout restart ds [-n namespace]
Step 2: Make changes to the configuration file values-hummix.yaml
Attention
Changes are made to the existing configuration file values-hummix.yaml, which was obtained and filled out during the installation of HUMMIX. Thoughtless changes to parameters in this file can lead to a loss of functionality of the HUMMIX application. Before making changes to the values-hummix.yaml file, we recommend creating a backup copy of it.
- Fill out the configuration file
values-hummix.yamlto enable autoscaling.
To enable autoscaling support, specify true in the parameter global.autoscaling.enabled. Define the desired autoscaling tool:
- hpa, Horizontal Pod Autoscaler. Used by default. As the load increases, more instances of the application modules are deployed. To enable this tool, no configuration of additional components is required.
- keda, Kubernetes Event-driven Autoscaling. An additional auto-scaling tool controlled by events. With KEDA, you can manage scaling based on load and the number of events that need to be processed. To enable this tool, first install and configure the KEDA add-on module.
- Specify the minimum and maximum number of replicas of the HUMMIX application services. Globally for all the services the values are defined in the
global.autoscaling.minReplicasandglobal.autoscaling.maxReplicasparameters.
global:
...
## service autoscaling
autoscaling:
enabled: true
## select autoscaling method
type: "hpa"
## minimum and maximum number of replicas
minReplicas: 1
maxReplicas: 9
...
You can also specify individual replica parameters for each service.
Step 3: Apply auto-scaling parameters for HUMMIX
You can update parameters for HUMMIX in two ways: online and offline.
Update parameters online
- Determine the version of the chart with which the HUMMIX application was installed or updated:
helm show chart hummix/hummix
Example of command execution:
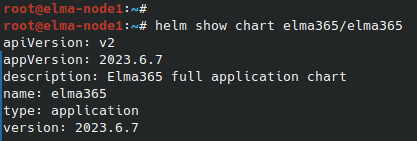
After the command execution, you see the chart version information in the version string. Save this value for the next step.
- Update the parameters using the
values-hummix.yamlconfiguration file. To do this, execute the following command specifying the installed chart version for the--versionflag instead of<hummix-chart-version>:
helm upgrade --install hummix hummix/hummix -f values-hummix.yaml --version <hummix-chart-version> --timeout=30m --wait [-n namespace]
Update parameters offline
Go to directory with downloaded HUMMIX chart and run the following command:
helm upgrade --install hummix ./hummix -f values-hummix.yaml --timeout=30m --wait [-n namespace]
It takes about 10-30 minutes to update the parameters. Wait for it to complete.
Step 4: Enable load redistribution in the Kubernetes cluster (optional)
The Descheduler is used for rebalancing clusters by evicting Pods that could potentially be run on more suitable nodes.
Attention
If your Kubernetes cluster has three or more nodes, it is recommended to install the Descheduler add-on component.
Example of Descheduler operation:
In a Kubernetes cluster, due to power supply issues, one of the nodes became unavailable. All HUMMIX application services that were hosted on the unavailable node will be started on the remaining operational nodes. After the power supply issues are resolved, the node will return to the cluster, but the HUMMIX application services will continue to operate on the other nodes. The Descheduler periodically checks the placement of Pods in the Kubernetes cluster. It redistributes the Pods among the nodes of the Kubernetes cluster using a set of pre-configured strategies. Redistribution of Pods will lead to the load balancing on the cluster nodes.
For more details on setting up and installing Descheduler, see Install Descheduler.
Step 5: Enable caching of DNS queries in the Kubernetes cluster (optional)
NodeLocal DNS Cache allows you to reduce the load on DNS queries in the Kubernetes cluster. NodeLocal DNS can increase the stability of DNS name resolution, which in turn will help avoid DNAT rules, connection tracking, and connection count limitations.
Attention
If your Kubernetes cluster has more than one node, it is recommended to install the NodeLocal DNS Cache add-on component.
For more details on setting up and installing NodeLocal DNS Cache, see Install NodeLocal DNS Cache.